4. Debian Application
4.1 Serial Terminal
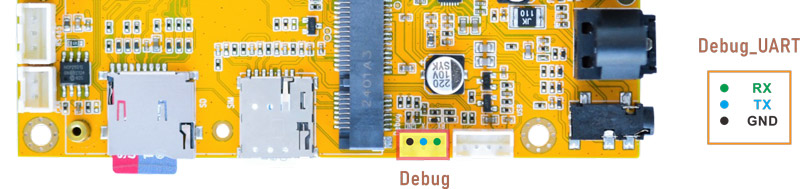
Connect the board and PC with USB Serial cable, then power on, the terminal will output boot information. The default baudrate is 1500000.

Serial Terminal
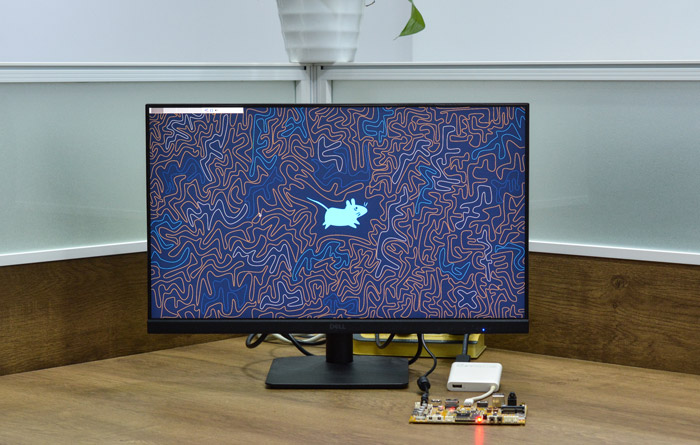
4.2 Display
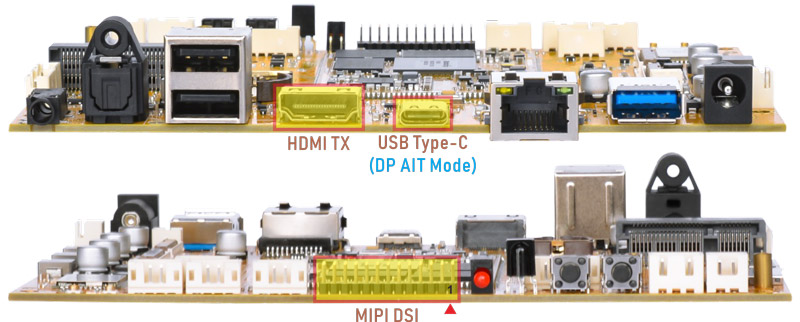
Display Ports
Idea3588S supports Triple-display: MIPI LCD, HDMI and Type-C(DP Alt Mode).
Warning
MIPI LCD hot swapping is not allowed.

Debian Triple-display
4.3 USB Type-C
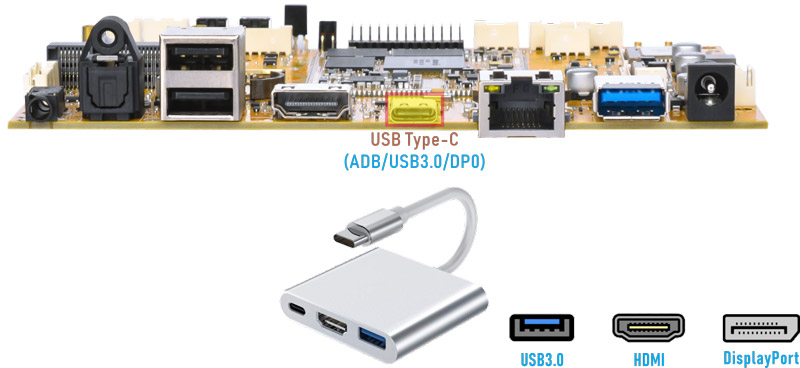
Docking station
Features Supported by the Type-C Interface:
Reversible Design: Allows insertion in either orientation for user convenience.
Data Transmission Roles: Supports flexible designation of host and device roles.
Multiple Protocol Support: Compatible with USB 3.0 and DisplayPort, enabling high-speed data transmission.
4.3.1 ADB
ADB is the command-line debugging tool. It can use for system logs, uploading and downloading the files, installing the applications, etc.
❶ Connect the board and PC host with Type-C cable.
❷ Install ADB driver on Windows system.
❸ Press Windows + R to open the Run program. Type cmd and press Enter
❹ Execute command to enable ADB.
1adb shell
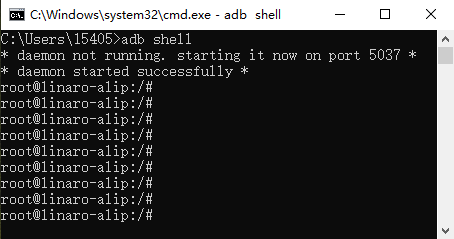
enable ADB
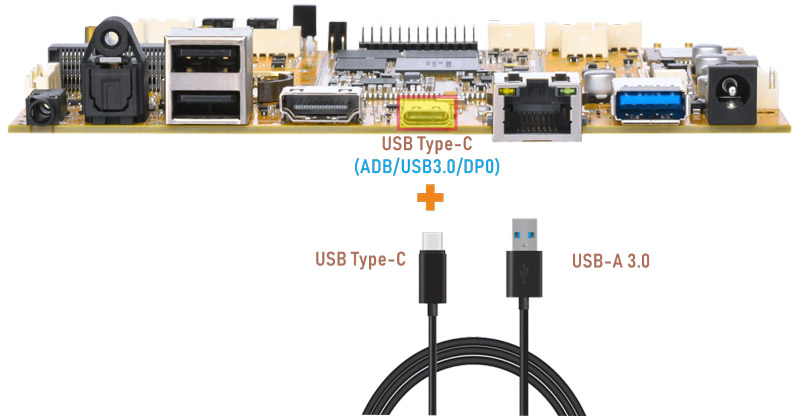
4.3.2 Type-C to USB3.0
Idea3588S supports Type-C to USB3.0. The device can use directly without install any driver.
After inserting the USB3.0 flash drive, an icon will appear on the desktop. Click the icon to automatically mount the device.
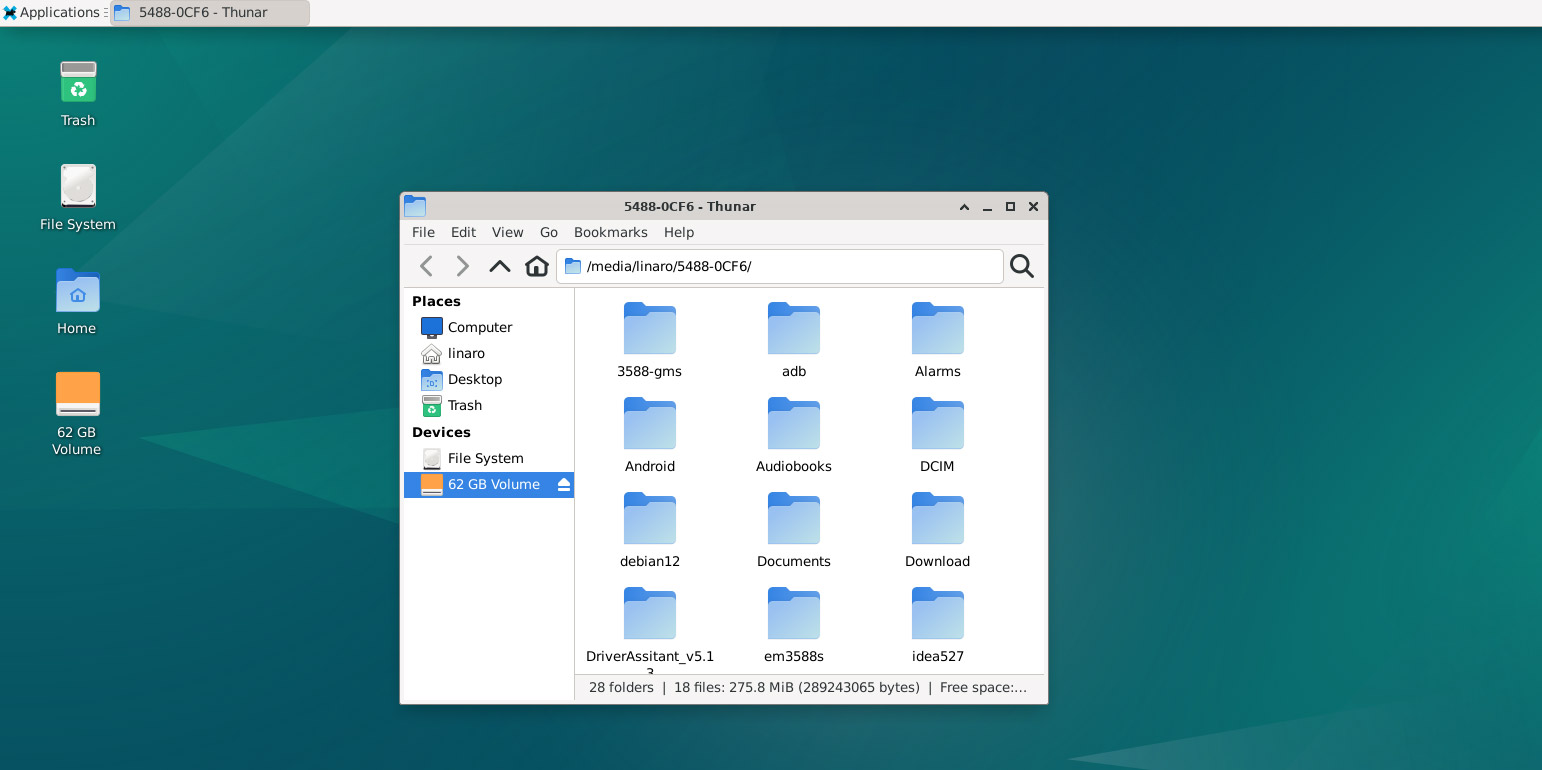
Type-C to USB3.0
4.3.3 DP Alt Mode
DisplayPort Alternate Mode (DP Alt Mode) is a technology that facilitates the transmission of DisplayPort video signals through a USB Type-C interface. It enables devices to output video and audio via a USB-C connection without requiring a dedicated DisplayPort connector. This allows users to connect a display using a single USB-C port while transmitting video, audio, and additional data.
Boardcon has conducted the testing at Type-C to HDMI/DP (3840x2160 @ 60Hz).
Type-C to HDMI
4.4 Ethernet
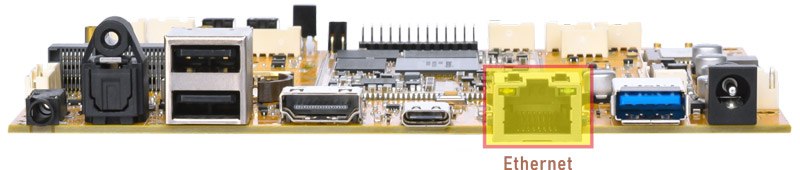
Connect the Board and router with an Ethernet cable.
1ifconfig //view the status of the network interfaces
#Serial terminal output
root@linaro-alip:/# ifconfig
end1: flags=4163<UP,BROADCAST,RUNNING,MULTICAST>  mtu 1500
     inet 192.168.0.133  netmask 255.255.255.0  broadcast 192.168.0.255
     inet6 fe80::b17c:eee1:d8ef:346d  prefixlen 64  scopeid 0x20<link>
     ether 3a:3b:7b:e4:37:fa  txqueuelen 1000  (Ethernet)
     RX packets 292  bytes 39618 (38.6 KiB)
     RX errors 0  dropped 15  overruns 0  frame 0
     TX packets 119  bytes 10989 (10.7 KiB)
     TX errors 0  dropped 0 overruns 0  carrier 0  collisions 0
     device interrupt 69
1ping -I end1 www.armdesigner.com //ping URL to test Network
#Serial terminal output
root@linaro-alip:/# ping -I end1 www.armdesigner.com
PING www.armdesigner.com (67.222.54.196) from 192.168.0.133 end1: 56(84) bytes of data.
64 bytes from 67-222-54-196.unifiedlayer.com (67.222.54.196): icmp_seq=1 ttl=48 time=194 ms
64 bytes from 67-222-54-196.unifiedlayer.com (67.222.54.196): icmp_seq=2 ttl=48 time=194 ms
64 bytes from 67-222-54-196.unifiedlayer.com (67.222.54.196): icmp_seq=3 ttl=48 time=195 ms
64 bytes from 67-222-54-196.unifiedlayer.com (67.222.54.196): icmp_seq=4 ttl=48 time=194 ms
64 bytes from 67-222-54-196.unifiedlayer.com (67.222.54.196): icmp_seq=5 ttl=48 time=203 ms
64 bytes from 67-222-54-196.unifiedlayer.com (67.222.54.196): icmp_seq=6 ttl=48 time=194 ms
64 bytes from 67-222-54-196.unifiedlayer.com (67.222.54.196): icmp_seq=7 ttl=48 time=194 ms
64 bytes from 67-222-54-196.unifiedlayer.com (67.222.54.196): icmp_seq=8 ttl=48 time=194 ms
64 bytes from 67-222-54-196.unifiedlayer.com (67.222.54.196): icmp_seq=9 ttl=48 time=197 ms
64 bytes from 67-222-54-196.unifiedlayer.com (67.222.54.196): icmp_seq=10 ttl=48 time=194 ms
^C
--- www.armdesigner.com ping statistics ---
10 packets transmitted, 10 received, 0% packet loss, time 9012ms
rtt min/avg/max/mdev = 193.668/195.281/203.010/2.687 ms
4.5 USB Host
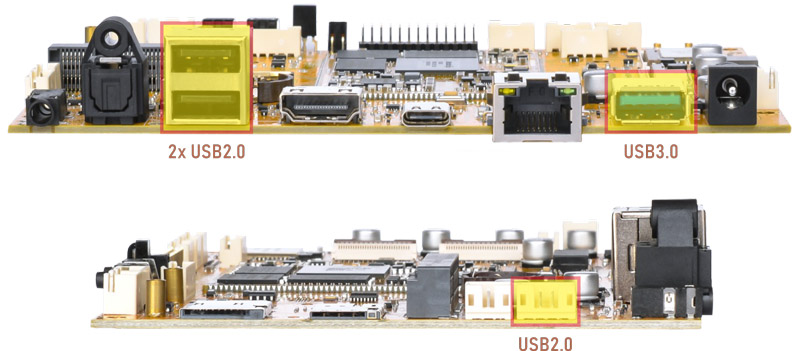
The USB Host can be used to connect USB mouse, USB keyboard, U-Disk or other USB devices.
After inserting the USB flash drive, an icon will appear on the desktop. Click the icon to automatically mount the device.
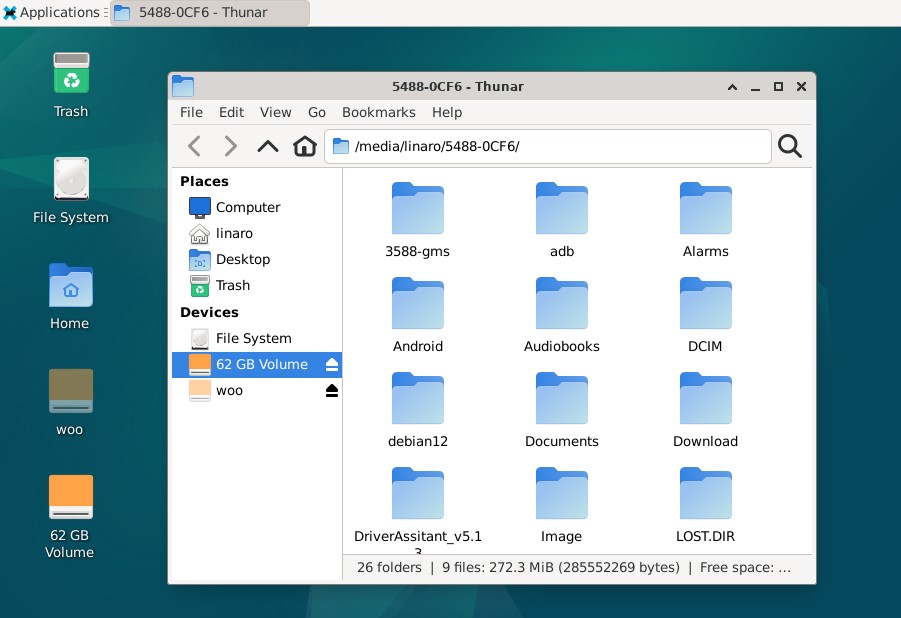
USB Device
The USB3.0 default support Superspeed.
#Serial terminal output
root@linaro-alip:/# [  667.590292] usb 2-1: new SuperSpeed USB device number 2 using xhci-hcd
[  667.621251] usb 2-1: New USB device found, idVendor=0dd8, idProduct=3b00, bcdDevice= 0.02
[  667.621301] usb 2-1: New USB device strings: Mfr=1, Product=2, SerialNumber=3
[  667.621324] usb 2-1: Product: OnlyDisk
[  667.621343] usb 2-1: Manufacturer: Netac
[  667.621363] usb 2-1: SerialNumber: 0A6544CD10427AB2
[  667.623814] usb-storage 2-1:1.0: USB Mass Storage device detected
[  667.625045] scsi host1: usb-storage 2-1:1.0
[  668.863371] scsi 1:0:0:0: Direct-Access     Netac    OnlyDisk         8.01 PQ: 0 ANSI: 6
[  668.867339] sd 1:0:0:0: [sdb] 121610240 512-byte logical blocks: (62.3 GB/58.0 GiB)
[  668.868328] sd 1:0:0:0: [sdb] Write Protect is off
[  668.869049] sd 1:0:0:0: [sdb] Write cache: disabled, read cache: enabled, doesn't support DPO or FUA
[  668.874950]  sdb: sdb1
[  668.875290] sd 1:0:0:0: [sdb] Attached SCSI removable disk
4.6 WiFi & Bluetooth
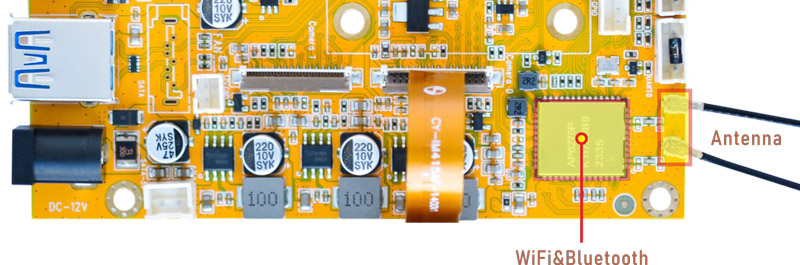
WiFi&BT module
4.6.1 WiFi
❶ Connect the WiFi antenna.
❷ Click the network icon in the top right corner of the UI interface.
❸ Select the SSID from the list of available networks and enter the password.
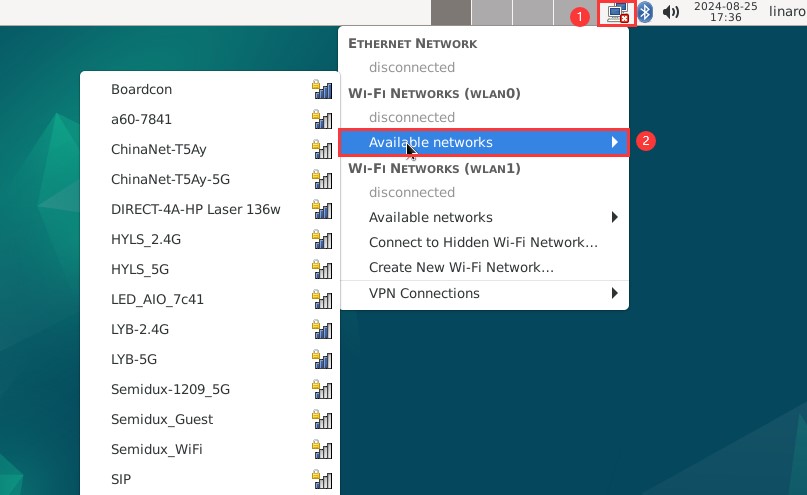
SSID
After connected, user can open Browser or ping URL/IP at terminal to test network.
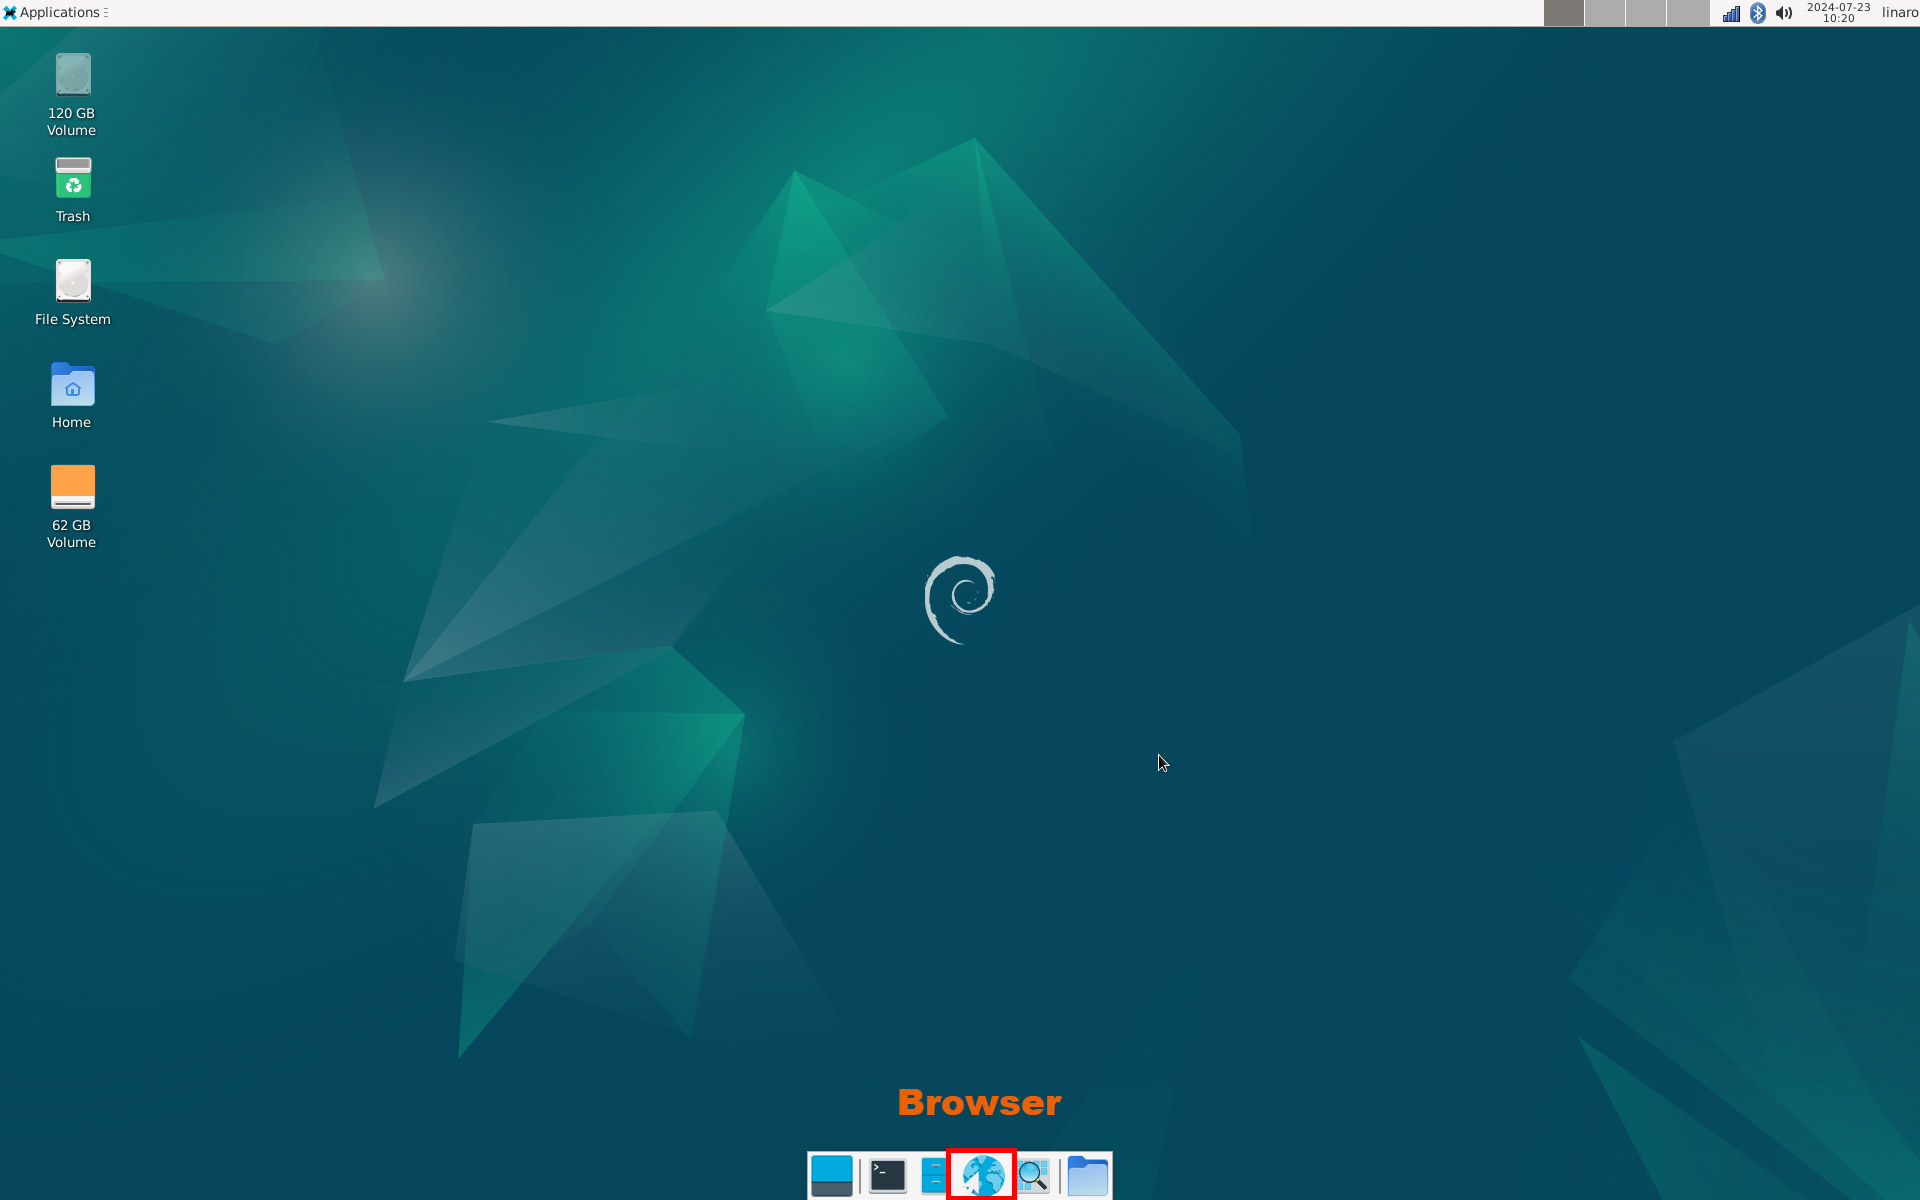
Open browser
1ifconfig
2ping -I wlan0 www.armdesigner.com
#Serial terminal output
root@linaro-alip:/# ifconfig
wlan0: flags=4163<UP,BROADCAST,RUNNING,MULTICAST>  mtu 1500
        inet 192.168.0.141  netmask 255.255.255.0  broadcast 192.168.0.255
        inet6 fe80::2970:d932:4830:11bf  prefixlen 64  scopeid 0x20<link>
        ether d4:9c:dd:f5:e7:22  txqueuelen 1000  (Ethernet)
        RX packets 89  bytes 8169 (7.9 KiB)
        RX errors 0  dropped 2  overruns 0  frame 0
        TX packets 72  bytes 6243 (6.0 KiB)
        TX errors 0  dropped 0 overruns 0  carrier 0  collisions 0

wlan1: flags=4099<UP,BROADCAST,MULTICAST>  mtu 1500
        ether d6:9c:dd:f5:e7:22  txqueuelen 1000  (Ethernet)
        RX packets 0  bytes 0 (0.0 B)
        RX errors 0  dropped 0  overruns 0  frame 0
        TX packets 0  bytes 0 (0.0 B)
        TX errors 0  dropped 0 overruns 0  carrier 0  collisions 0
root@linaro-alip:/# ping -I wlan0 www.armdesigner.com
PING www.armdesigner.com (67.222.54.196) from 192.168.0.141 wlan0: 56(84) bytes of data.
64 bytes from 67-222-54-196.unifiedlayer.com (67.222.54.196): icmp_seq=1 ttl=48 time=342 ms
64 bytes from 67-222-54-196.unifiedlayer.com (67.222.54.196): icmp_seq=2 ttl=48 time=197 ms
64 bytes from 67-222-54-196.unifiedlayer.com (67.222.54.196): icmp_seq=3 ttl=48 time=197 ms
64 bytes from 67-222-54-196.unifiedlayer.com (67.222.54.196): icmp_seq=4 ttl=48 time=197 ms
64 bytes from 67-222-54-196.unifiedlayer.com (67.222.54.196): icmp_seq=5 ttl=48 time=197 ms
64 bytes from 67-222-54-196.unifiedlayer.com (67.222.54.196): icmp_seq=6 ttl=48 time=197 ms
64 bytes from 67-222-54-196.unifiedlayer.com (67.222.54.196): icmp_seq=7 ttl=48 time=198 ms
64 bytes from 67-222-54-196.unifiedlayer.com (67.222.54.196): icmp_seq=8 ttl=48 time=201 ms
64 bytes from 67-222-54-196.unifiedlayer.com (67.222.54.196): icmp_seq=9 ttl=48 time=216 ms
64 bytes from 67-222-54-196.unifiedlayer.com (67.222.54.196): icmp_seq=10 ttl=48 time=197 ms
^C
--- www.armdesigner.com ping statistics ---
4.6.2 Bluetooth
❶ Click the Bluetooth icon in the top right corner of the UI interface.
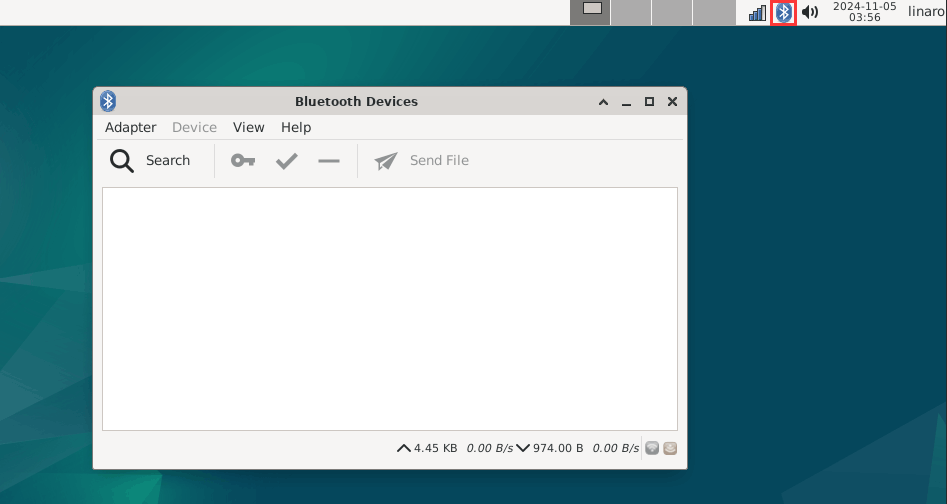
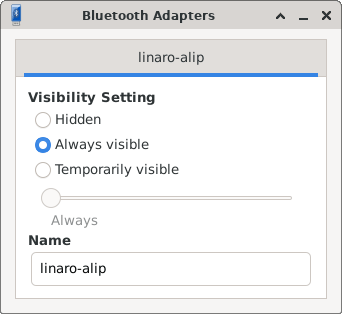
❷ The Bluetooth device name is hidden by default. Set the Bluetooth device name to be visible.
Click Adapter -> Preferences -> Always visible

❸ Click Search to start searching and select the available device in the list to pair.
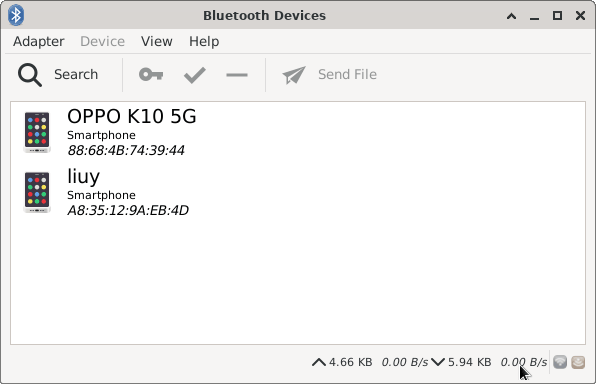
After pairing, devices can connect with each other automatically.
4.7 Audio I/O

Headset
❶ Plug the Headset into the Audio jack
❷ View sound card
1cat /proc/asound/cards
#Serial terminal output
root@linaro-alip:/# cat /proc/asound/cards
0 [rockchipes8388 ]: rockchip-es8388 - rockchip-es8388
                   rockchip-es8388
1 [rockchipspdiftx]: simple-card - rockchip,spdif-tx0
                   rockchip,spdif-tx0
2 [rockchipdp0    ]: rockchip_dp0 - rockchip,dp0
                   rockchip,dp0
3 [rockchiphdmi0  ]: rockchip-hdmi0 - rockchip-hdmi0
                   rockchip-hdmi0
❸ Record
1arecord -Dhw:0,0 -f cd record.wav //-Dhw:0,0 is card0 and device0
❹ Playback
1aplay -Dhw:0,0 record.wav //Adudio output via headset
#Audio output instructions
aplay -Dhw:0,0 record.wav   //output via Headset
aplay -Dhw:2,0 record.wav   //output via Type-C display
aplay -Dhw:3,0 record.wav   //output via HDMI
4.8 4G & GPS
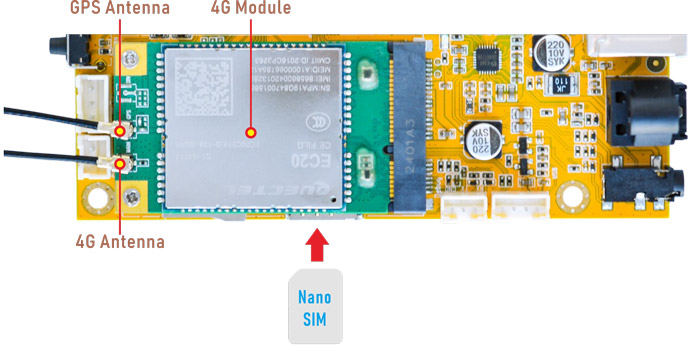
4G module
4.8.1 4G
❶ Insert 4G module to mPCIe socket (4G model: EC20).
❷ Connect antenna and insert SIM card.
❸ Power on.
❹ Execute commands to connect 4G network.
1pppd call quectel-ppp & //Initiate the PPP connection
#Serial terminal output
root@linaro-alip:/# pppd call quectel-ppp &
[1] 2554
root@linaro-alip:/# pppd options in effect:
debug           # (from /etc/ppp/peers/quectel-ppp)
nodetach                # (from /etc/ppp/peers/quectel-ppp)
dump            # (from /etc/ppp/peers/quectel-ppp)
noauth          # (from /etc/ppp/peers/quectel-ppp)
user test               # (from /etc/ppp/peers/quectel-ppp)
password ??????         # (from /etc/ppp/peers/quectel-ppp)
remotename 3gppp                # (from /etc/ppp/peers/quectel-ppp)
/dev/ttyUSB3            # (from /etc/ppp/peers/quectel-ppp)
115200          # (from /etc/ppp/peers/quectel-ppp)
lock            # (from /etc/ppp/peers/quectel-ppp)
connect chat -s -v -f /etc/ppp/peers/quectel-chat-connect               # (from /etc/ppp/peers/quectel-ppp)
disconnect chat -s -v -f /etc/ppp/peers/quectel-chat-disconnect         # (from /etc/ppp/peers/quectel-ppp)
nocrtscts               # (from /etc/ppp/peers/quectel-ppp)
modem           # (from /etc/ppp/peers/quectel-ppp)
asyncmap 0              # (from /etc/ppp/options)
lcp-echo-failure 4              # (from /etc/ppp/options)
lcp-echo-interval 30            # (from /etc/ppp/options)
hide-password           # (from /etc/ppp/peers/quectel-ppp)
novj            # (from /etc/ppp/peers/quectel-ppp)
novjccomp               # (from /etc/ppp/peers/quectel-ppp)
ipcp-accept-local               # (from /etc/ppp/peers/quectel-ppp)
ipcp-accept-remote              # (from /etc/ppp/peers/quectel-ppp)
ipparam 3gppp           # (from /etc/ppp/peers/quectel-ppp)
noipdefault             # (from /etc/ppp/peers/quectel-ppp)
ipcp-max-failure 30             # (from /etc/ppp/peers/quectel-ppp)
defaultroute            # (from /etc/ppp/peers/quectel-ppp)
usepeerdns              # (from /etc/ppp/peers/quectel-ppp)
noccp           # (from /etc/ppp/peers/quectel-ppp)
noipx           # (from /etc/ppp/options)
abort on (BUSY)
abort on (NO CARRIER)
abort on (NO DIALTONE)
abort on (ERROR)
abort on (NO ANSWER)
timeout set to 30 seconds
send (AT^M)
expect (OK)
AT^M^M
OK
 -- got it

send (ATE0^M)
expect (OK)
^M
ATE0^M^M
OK
 -- got it

send (ATI;+CSUB;+CSQ;+CPIN?;+COPS?;+CGREG?;&D2^M)
expect (OK)
^M
^M
Quectel^M
EC25^M
Revision: EC25EUXGAR08A17M1G^M
^M
SubEdition: V01^M
^M
+CSQ: 31,99^M
^M
+CPIN: READY^M
^M
+COPS: 0,0,"CHINA MOBILE",7^M
^M
+CGREG: 0,1^M
^M
OK
 -- got it
send (AT+CGDCONT=1,"IP","3gnet",,0,0^M)
expect (OK)
^M
^M
OK
 -- got it

send (ATD*99#^M)
expect (CONNECT)
^M
^M
CONNECT
 -- got it

Script chat -s -v -f /etc/ppp/peers/quectel-chat-connect finished (pid 2555), status = 0x0
Serial connection established.
using channel 1
Using interface ppp0
Connect: ppp0 <--> /dev/ttyUSB3
sent [LCP ConfReq id=0x1 <asyncmap 0x0> <magic 0x6ff22c2e> <pcomp> <accomp>]
rcvd [LCP ConfReq id=0x0 <asyncmap 0x0> <auth chap MD5> <magic 0x3b1465ce> <pcomp> <accomp>]
sent [LCP ConfAck id=0x0 <asyncmap 0x0> <auth chap MD5> <magic 0x3b1465ce> <pcomp> <accomp>]
rcvd [LCP ConfAck id=0x1 <asyncmap 0x0> <magic 0x6ff22c2e> <pcomp> <accomp>]
sent [LCP EchoReq id=0x0 magic=0x6ff22c2e]
rcvd [LCP DiscReq id=0x1 magic=0x3b1465ce]
rcvd [CHAP Challenge id=0x1 <e7eec240d439b4adcc69822ec6b0da7e>, name = "UMTS_CHAP_SRVR"]
sent [CHAP Response id=0x1 <211e0059d0ee7fe0dcc9160e5f275243>, name = "test"]
rcvd [LCP EchoRep id=0x0 magic=0x3b1465ce 6f f2 2c 2e]
rcvd [CHAP Success id=0x1 ""]
CHAP authentication succeeded
CHAP authentication succeeded
sent [IPCP ConfReq id=0x1 <addr 0.0.0.0> <ms-dns1 0.0.0.0> <ms-dns2 0.0.0.0>]
sent [IPV6CP ConfReq id=0x1 <addr fe80::bd8f:1921:d1c5:85b3>]
rcvd [IPCP ConfReq id=0x0]
sent [IPCP ConfNak id=0x0 <addr 0.0.0.0>]
rcvd [IPCP ConfNak id=0x1 <addr 10.33.147.246> <ms-dns1 120.196.165.7> <ms-dns2 221.179.38.7>]
sent [IPCP ConfReq id=0x2 <addr 10.33.147.246> <ms-dns1 120.196.165.7> <ms-dns2 221.179.38.7>]
rcvd [IPCP ConfReq id=0x1]
sent [IPCP ConfAck id=0x1]
rcvd [IPCP ConfAck id=0x2 <addr 10.33.147.246> <ms-dns1 120.196.165.7> <ms-dns2 221.179.38.7>]
Could not determine remote IP address: defaulting to 10.64.64.64
Script /etc/ppp/ip-pre-up started (pid 2563)
Script /etc/ppp/ip-pre-up finished (pid 2563), status = 0x0
local  IP address 10.33.147.246
remote IP address 10.64.64.64
primary   DNS address 120.196.165.7
secondary DNS address 221.179.38.7
Script /etc/ppp/ip-up started (pid 2566)
Script /etc/ppp/ip-up finished (pid 2566), status = 0x0
sent [IPV6CP ConfReq id=0x1 <addr fe80::bd8f:1921:d1c5:85b3>]
❺ Test network.
1ifconfig                        //Check network status
2ping -I ppp0 www.armdesigner.com
#Serial terminal output
root@linaro-alip:/# ifconfig
ppp0: flags=4305<UP,POINTOPOINT,RUNNING,NOARP,MULTICAST>  mtu 1500
     inet 10.33.147.246  netmask 255.255.255.255  destination 10.64.64.64
     ppp  txqueuelen 3  (Point-to-Point Protocol)
     RX packets 141  bytes 10464 (10.2 KiB)
     RX errors 0  dropped 0  overruns 0  frame 0
     TX packets 180  bytes 12814 (12.5 KiB)
     TX errors 0  dropped 0 overruns 0  carrier 0  collisions 0
root@linaro-alip:/# ping -I ppp0 www.armdesigner.com
PING www.armdesigner.com (67.222.54.196) from 10.33.147.246 ppp0: 56(84) bytes of data.
64 bytes from 67-222-54-196.unifiedlayer.com (67.222.54.196): icmp_seq=1 ttl=47 time=212 ms
64 bytes from 67-222-54-196.unifiedlayer.com (67.222.54.196): icmp_seq=2 ttl=47 time=210 ms
64 bytes from 67-222-54-196.unifiedlayer.com (67.222.54.196): icmp_seq=3 ttl=47 time=209 ms
64 bytes from 67-222-54-196.unifiedlayer.com (67.222.54.196): icmp_seq=4 ttl=47 time=208 ms
64 bytes from 67-222-54-196.unifiedlayer.com (67.222.54.196): icmp_seq=5 ttl=47 time=206 ms
64 bytes from 67-222-54-196.unifiedlayer.com (67.222.54.196): icmp_seq=6 ttl=47 time=229 ms
64 bytes from 67-222-54-196.unifiedlayer.com (67.222.54.196): icmp_seq=7 ttl=47 time=208 ms
64 bytes from 67-222-54-196.unifiedlayer.com (67.222.54.196): icmp_seq=8 ttl=47 time=207 ms
64 bytes from 67-222-54-196.unifiedlayer.com (67.222.54.196): icmp_seq=9 ttl=47 time=220 ms
^C
--- www.armdesigner.com ping statistics ---
9 packets transmitted, 9 received, 0% packet loss, time 8010ms
rtt min/avg/max/mdev = 206.463/211.970/228.782/7.196 ms
4.8.2 GPS
❶ Plug the EC20 module to mPCIe socket.
❷ Connect GPS antenna.
❸ Power on.
❹ Execute commands to test GPS.
1echo -e "AT+QGPS=1\r\n" > /dev/ttyUSB2
2cat /dev/ttyUSB1
#Serial terminal output
root@linaro-alip:/# echo -e "AT+QGPS=1\r\n" > /dev/ttyUSB2
root@linaro-alip:/# cat /dev/ttyUSB1
$GPVTG,,T,,M,,N,,K,N*2C

$GPGSA,A,1,,,,,,,,,,,,,,,,*32

$GPGGA,,,,,,0,,,,,,,,*66

$GPRMC,,V,,,,,,,,,,N,V*29

$GPVTG,,T,,M,,N,,K,N*2C

$GPGSA,A,1,,,,,,,,,,,,,,,,*32

$GPGGA,,,,,,0,,,,,,,,*66

$GPRMC,,V,,,,,,,,,,N,V*29
4.9 SD Card
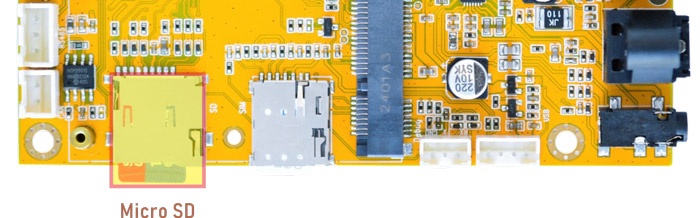
After inserting the SD Card, an icon will appear on the desktop. Click the icon to automatically mount the device.
Mounted SD card
4.10 RS485
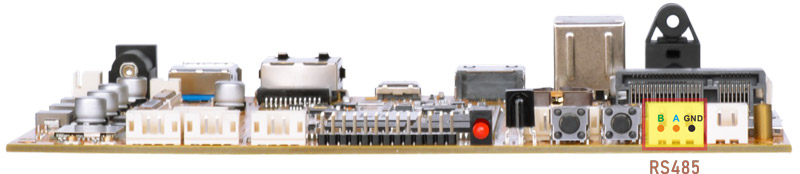
❶ Connect PC and board with USB-to-RS485 adapter.
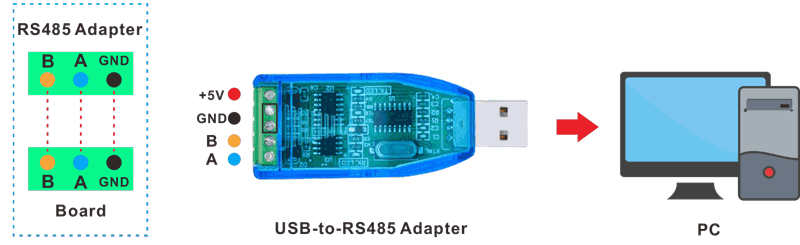
RS485 connection
❷ Open the Serial Terminal and set baud rate for the board and RS485 adapter respectively.
Baud rate: board - 1500000; RS485 adapter - 115200
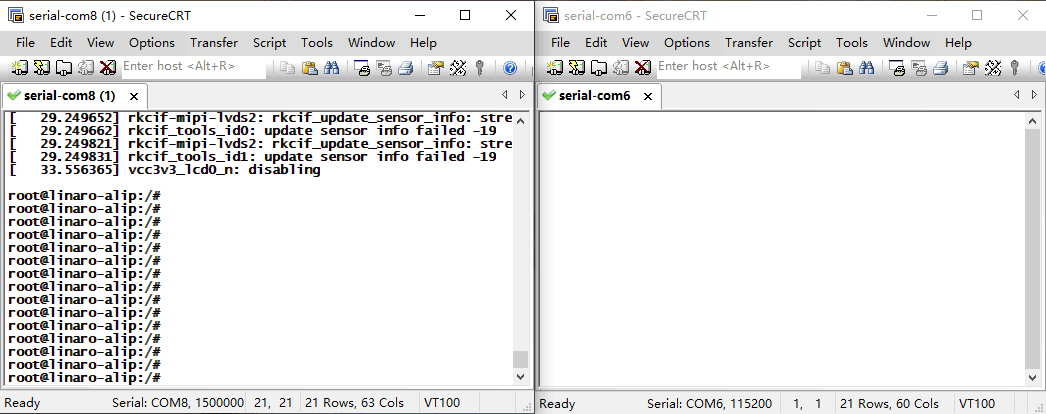
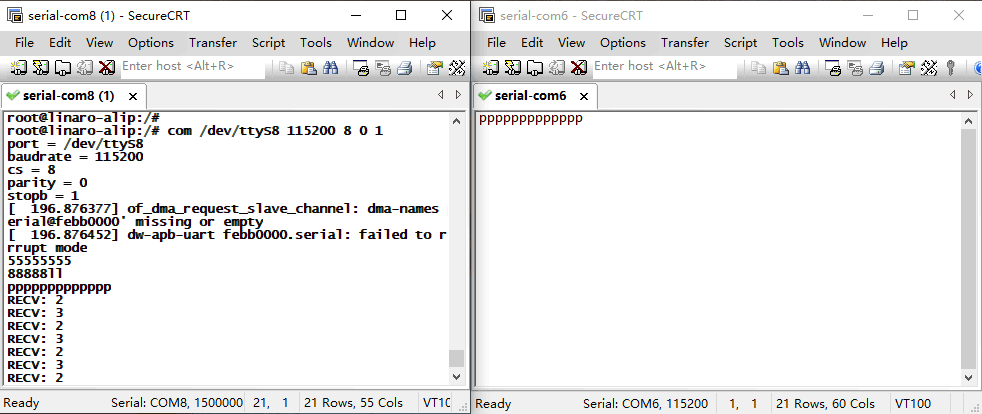
❸ Execute command on the terminal serial port of board.
1com /dev/ttyS8 115200 8 0 1
❹ Input character to test RS485 communication.
4.11 CAN
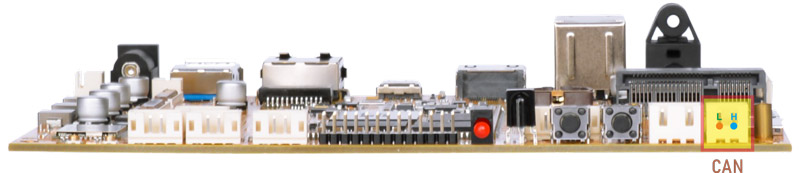
❶ Connect PC and board with USB-to-CAN adapter.
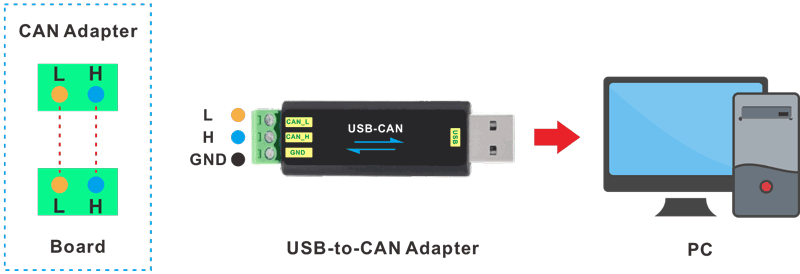
CAN connection
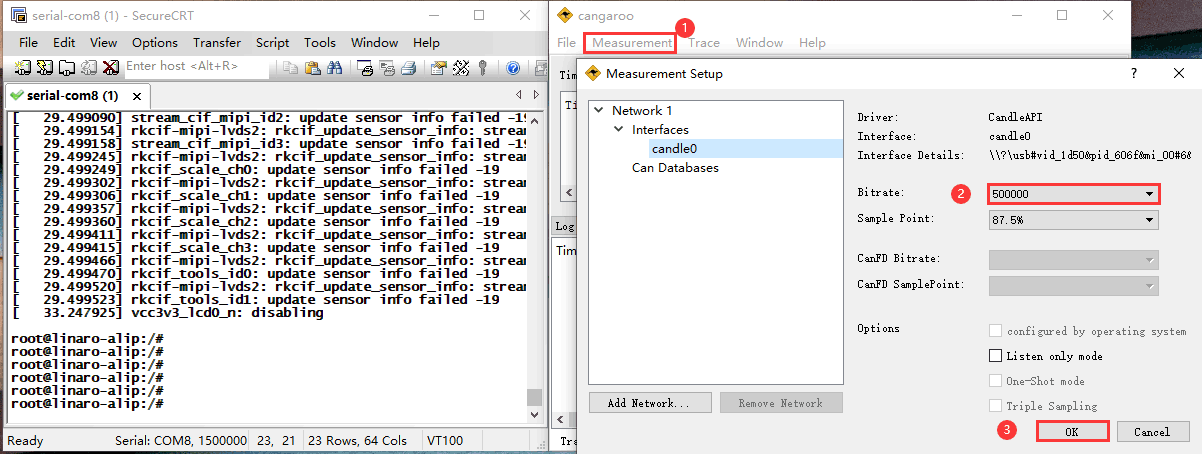
❷ Open the CAN application and set the baudrate to 500000 on PC.
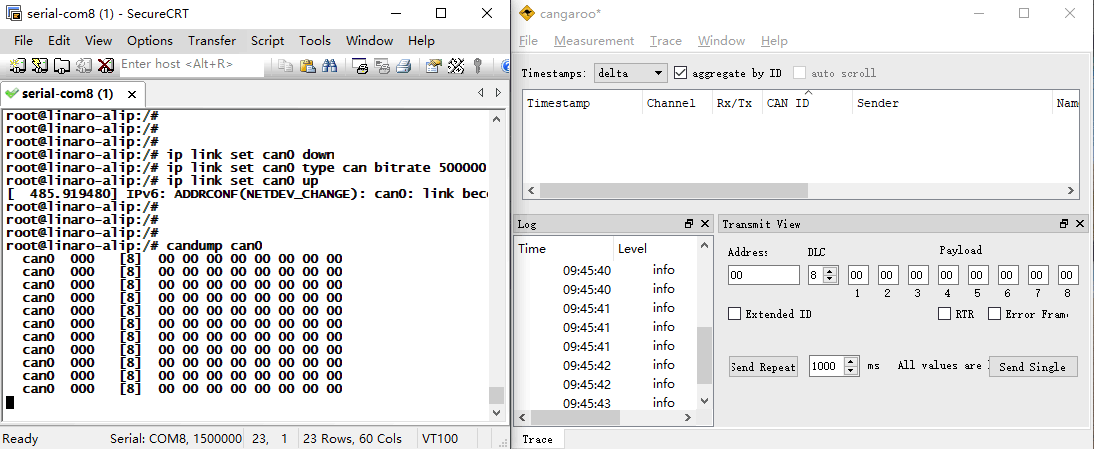
❸ Execute commands on Serial Terminal to configure CAN.
1ip link set can0 down
2ip link set can0 type can bitrate 500000
3ip link set can0 up

❹ Configure CAN as receiver.
1candump can0
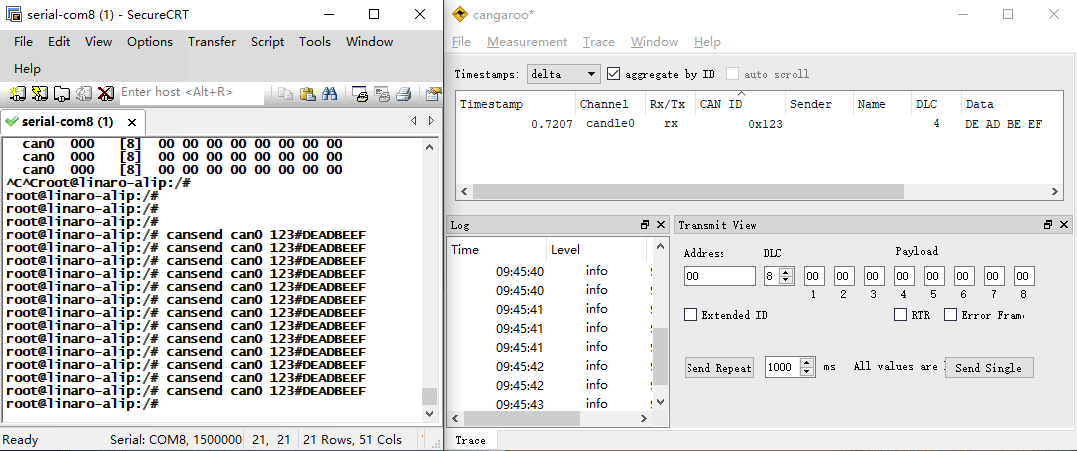
❺ set CAN as Transmitter.
1cansend can0 123#DEADBEEF
4.12 UART

❶ Connect RX and TX of UART.
❷ Execute command and input character to test
1com /dev/ttyS0 115200 8 0 1 //UART0
#Serial terminal output
root@linaro-alip:/# com /dev/ttyS0 115200 8 0 1
port = /dev/ttyS0
baudrate = 115200
cs = 8
parity = 0
stopb = 1
ooooooouuuu
RECV: ooooooouuuu
2222222222222
RECV: 2222222222222
Tests for UART1 and UART2 are similar to UART0.
com /dev/ttyS7 115200 8 0 1    //UART1
com /dev/ttyS4 115200 8 0 1    //UART2
4.13 IR
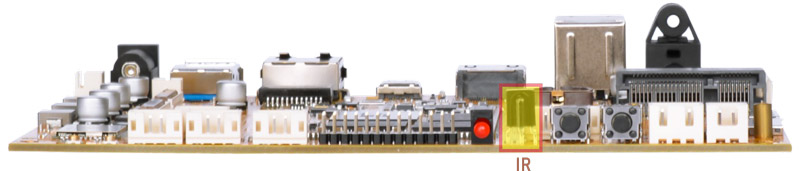
❶ Turn on IR debugging log.
1echo 1 > /sys/module/rockchip_pwm_remotectl/parameters/code_print
❷ Press the Infrared controller, you can view the received datas on the terminal.
#Serial terminal output
root@linaro-alip:/# echo 1 > /sys/module/rockchip_pwm_remotectl/parameters/code_print
[ 2295.444692] USERCODE=0x1818
[ 2295.471830] RMC_GETDATA=98
[ 2296.443379] USERCODE=0x1818
[ 2296.470515] RMC_GETDATA=99
[ 2297.131325] USERCODE=0x1818
[ 2297.158498] RMC_GETDATA=9a
[ 2297.664355] USERCODE=0x1818
[ 2297.691488] RMC_GETDATA=9b
[ 2298.623416] USERCODE=0x1818
[ 2298.650548] RMC_GETDATA=97
[ 2300.535252] USERCODE=0x1818
[ 2300.562433] RMC_GETDATA=e6
4.14 RTC
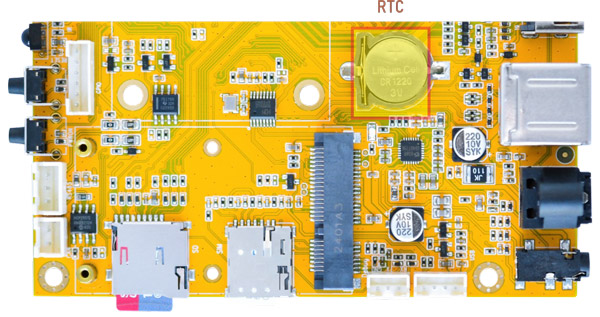
❶ Insert a CR1220 battery before test. It keeps the time running when the main power is off.
❷ Set date and time manually.
1date "2024-11-06 10:15:30"              //set system date
2hwclock -w                              //set the hardware clock to current system time
3hwclock                                 //display date and time
#Serial terminal output
root@linaro-alip:/# date -s "2024-11-06 10:15:30"
Wed Nov  6 10:15:30 UTC 2024
root@linaro-alip:/# hwclock -w
root@linaro-alip:/# hwclock
2024-11-06 10:15:43.492278+00:00
root@linaro-alip:/# hwclock
2024-11-06 10:15:56.176138+00:00
root@linaro-alip:/# hwclock
2024-11-06 10:16:05.824220+00:00
root@linaro-alip:/#
❸ Power off. Wait for a moment, power on again, and then execute the command hwclock, you will find that the time is saved.
#Serial terminal output
root@linaro-alip:/# hwclock
2024-11-06 15:22:23.071969+00:00
root@linaro-alip:/# hwclock
2024-11-06 15:23:18.106270+00:00
root@linaro-alip:/# hwclock
2024-11-06 15:24:18.183721+00:00
root@linaro-alip:/# hwclock
2024-11-06 15:27:41.025372+00:00
4.15 FAN

Connect FAN (12V, 2-pin/2.0mm pitch connector) to the board. Boardcon firmware has preset that the fan works when the CPU temperature exceeds 45° C.
4.16 Camera
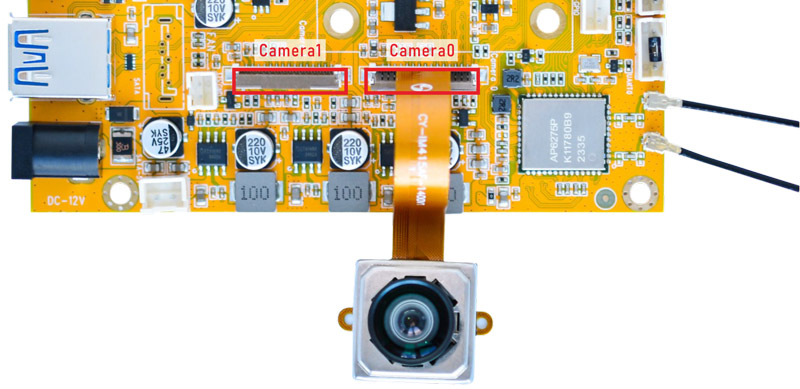
❶ Connect the camera module (DC-IM415-1214V1) to the development board before power on. Idea3588S Camera0 and Camera1 share the signal I2C2, Boardcon Debian 12 firmware default camera0 is enabled.
❷ View the device channel
1grep "" /sys/class/video4linux/v*/name | grep mainpath
2grep "" /sys/class/video4linux/v*/name | grep selfpath
#Serial terminal output
root@linaro-alip:/# grep "" /sys/class/video4linux/v*/name | grep mainpath
/sys/class/video4linux/video11/name:rkisp_mainpath
root@linaro-alip:/# grep "" /sys/class/video4linux/v*/name | grep selfpath
/sys/class/video4linux/video12/name:rkisp_selfpath
❸ Preview/ record video/ take photos
1gst-launch-1.0 v4l2src device=/dev/video11 ! video/x-raw,format=NV12,width=1920,height=1080, framerate=30/1 ! xvimagesink        //Preview
2gst-launch-1.0 v4l2src device=/dev/video11 num-buffers=100 ! video/x-raw,format=NV12,width=1920,height=1088,framerate=30/1 ! videoconvert ! mpph264enc ! h264parse ! mp4mux ! filesink location=/tmp/h264.mp4  //Record
3gst-launch-1.0 -v v4l2src device=/dev/video11 num-buffers=10 ! video/x-raw,format=NV12,width=1280,height=800 ! mppjpegenc ! multifilesink location=/tmp/test%05d.jpg    //take photos
4.17 Video Playback
4.17.1 Built-in playback
The script instruction directory is in /rockchip-test/video/, just run it.
#Serial terminal output
root@linaro-alip:/# ls /rockchip-test/video/
test_dec-gst.sh     test_enc-gst.sh         test_gst_video_maxfps.sh
test_dec-mpv.sh     test_gst_multivideo.sh  video_stresstest.sh
test_dec-parole.sh  test_gst_video.sh       video_test.sh
test_dec-qt.sh      test_gst_video_fps.sh
root@linaro-alip:/# cd /rockchip-test/video/
root@linaro-alip:/rockchip-test/video#
root@linaro-alip:/rockchip-test/video# ./test_gst_video.sh
[  145.071183] dw9714 3-000c: cmd 0x80685600 not supported
Setting pipeline to PAUSED ...
Pipeline is PREROLLING ...
Redistribute latency...
mpp[2175]: mpp_info: mpp version: 239e15ea author: Herman Chen   2024-06-12 docs: Update 1.0.6 CHANGELOG.md
mpp[2175]: mpp_platform: client 12 driver is not ready!
mpp[2175]: mpp_info: mpp version: 239e15ea author: Herman Chen   2024-06-12 docs: Update 1.0.6 CHANGELOG.md
mpp[2175]: mpp_info: mpp version: 239e15ea author: Herman Chen   2024-06-12 docs: Update 1.0.6 CHANGELOG.md
mpp[2175]: mpp_info: mpp version: 239e15ea author: Herman Chen   2024-06-12 docs: Update 1.0.6 CHANGELOG.md
mpp[2175]: mpp_info: mpp version: 239e15ea author: Herman Chen   2024-06-12 docs: Update 1.0.6 CHANGELOG.md
Redistribute latency...
mpp[2175]: h264d_api: is_avcC=1
Pipeline is PREROLLED ...
Prerolled, waiting for async message to finish...
Setting pipeline to PLAYING ...
Redistribute latency...
New clock: GstSystemClock
Got EOS from element "pipeline0".
Execution ended after 0:00:29.560919972
Setting pipeline to NULL ...
Freeing pipeline ...
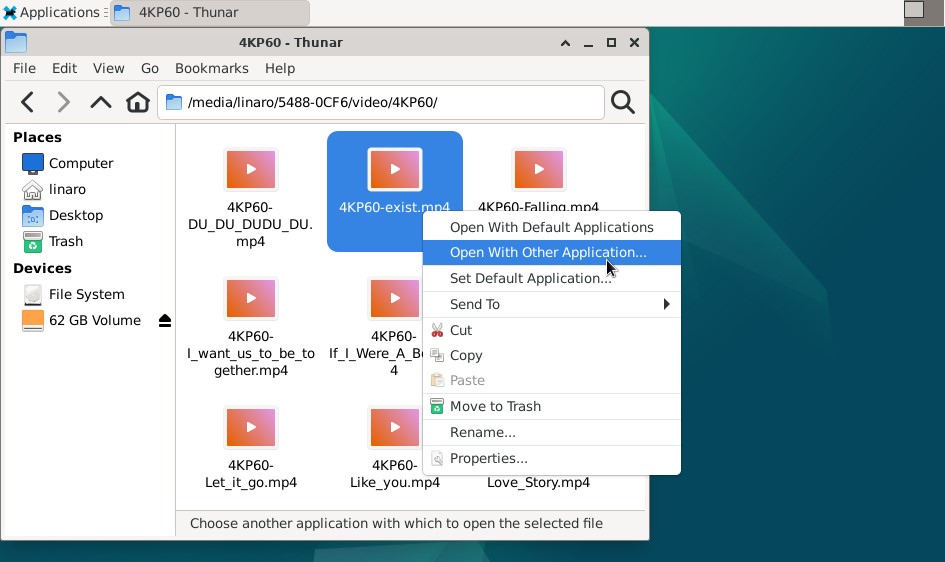
4.17.2 Browser playback
Select Video file, Right-click and select Chromium Browser to play.
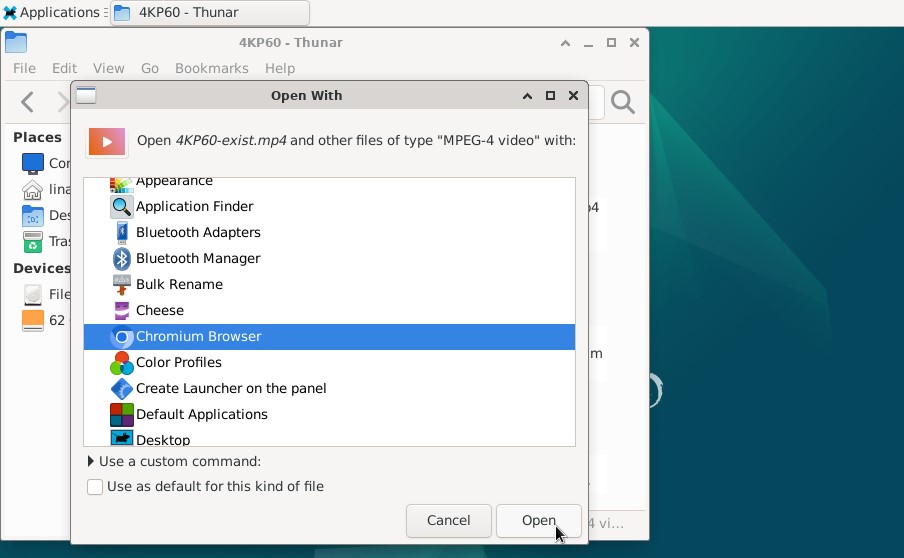
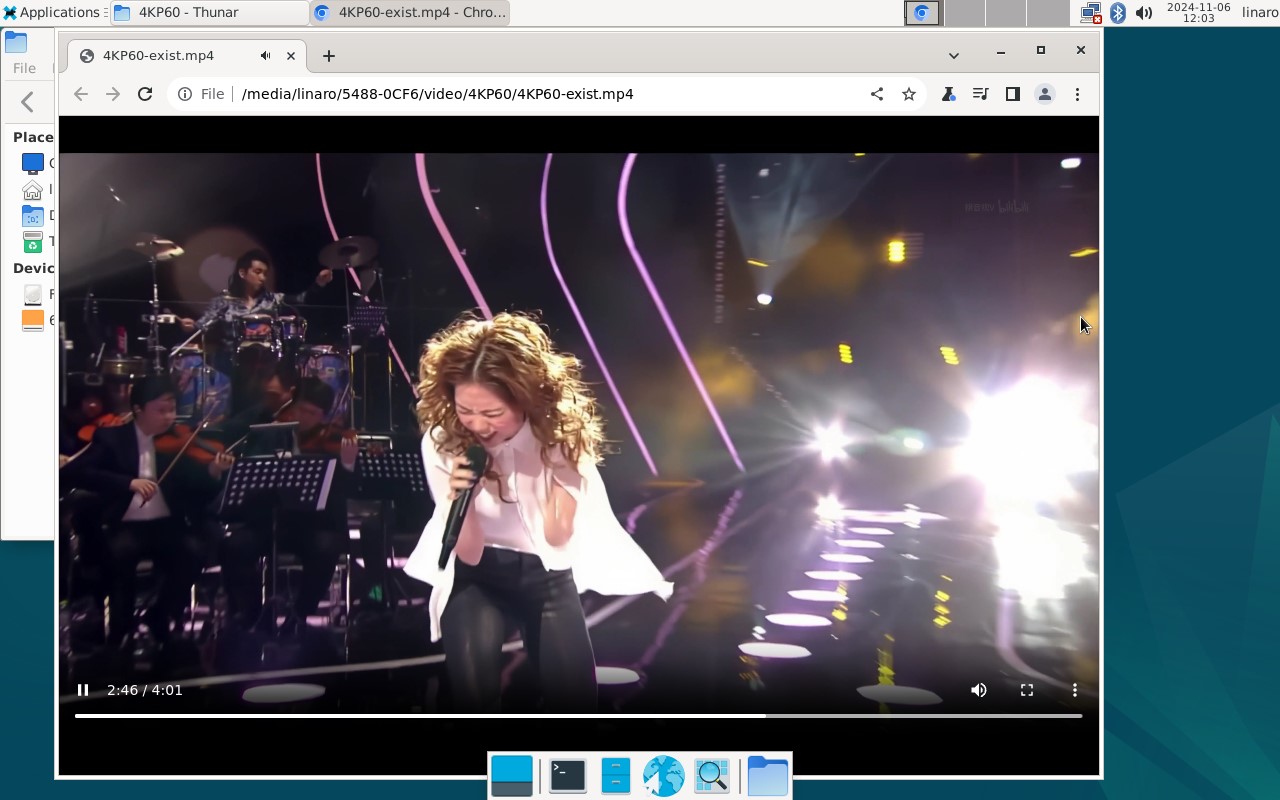
Play video in Chromium Browser
4.17.3 Command line
1gst-play-1.0 --videosink=xvimagesink /media/linaro/5488-0CF6/video/8KP30/H265_8KP30-2.mp4 --audiosink="alsasink device=hw:0,0"
Command explanation:
/media/linaro/5488-0CF6/video/8KP30/H265_8KP30-2.mp4 the media file path to be played.
--audiosink="alsasink device=hw:0,0" specifies the Audio output device.